My Tacoma Overlanding build
It didn’t take long for me to start outfitting my new Tacoma with camping gear, and once the process started it escalated pretty rapidly. It took over a year to complete and lots of trial and error, but here we are. My truck is now a highly capable camping machine!
Let’s dive into it and I’ll talk through everything I learned a long the way.

Step 1: Interior load-out
My first revelations came when I watched this overlanding Tacoma youtuve video by “Last Line of Defense”. He gives an amazing walk through of his Tacoma and he describes all of the gear he has stored: https://www.youtube.com/watch?v=eYl7l10M1WA
This video got my brain buzzing! I took notes on some of his suggestions and quickly came up with my own. Over time, I came up with a nice load-out for the interior that has all the essentials I could need.
Including:
Cliq chairs. These actually fit perfectly in the corners behind the rear seats.
Nomatix Towel
Bug spray and a Thermacel
Sunscreen
A hammock, stored under the rear seat
A rain coat and a small umbrella
A small Kobalt toolkit
Tire inflator and jump-starter
note: you can see more details with links in my other Tacoma related blog posts.
Step 2: Retrax XR Tonneau cover
It wasn’t long before I realized I needed a truck bed tonneau cover to keep any gear that I had in the bed from getting soaked when it rained. This was my first big upgrade. Naturally I chose the beefiest cover I could find, the Retrax XR. This cover supports enough weight that you could walk on it and it allows you to easily install cross bars that integrate directly with the cover. Hell yeah.
There are several amazing things about this cover. One of my favorites is how you can lock it down in any position, so if you have a surfboarding hanging out of the tailgate, instead of needing to strap it down you can just close the cover up to the board so that it is putting pressure on the board and then lock it in place.

Another cool thing about this cover is it gives you a little ‘shelf’ behind the rear windows for you to put stuff, like coolers.

This cover has worked well- but I have also had a hard time with it. After about six months of use, it started leaking and I’ve never been able to get it to stop. Even after working with Retrax and having it reinstalled it’s still letting water in.
Step 3: Truck Bed load-out
Now that I could keep my truck bed contents relatively dry and secure, I started to add gear into the bed. Because I often carry surfboards, kayaks an other big equipment I try to keep the floor area clear so I have a strict rule that nothing permanent goes into the bed unless it mounts to the side.
The bedrug was my first accessory, and I love it!
roll up table by GCI attaches above the passenger side wheel well
YETI Lowlands outdoor blanket attaches beside the table
Waterport 3.8 gallon truck shower mounts to the driver’s side bed rail
Decked waterproof tool box. I found a way to bungee this in on top of the driver’s side wheel well.
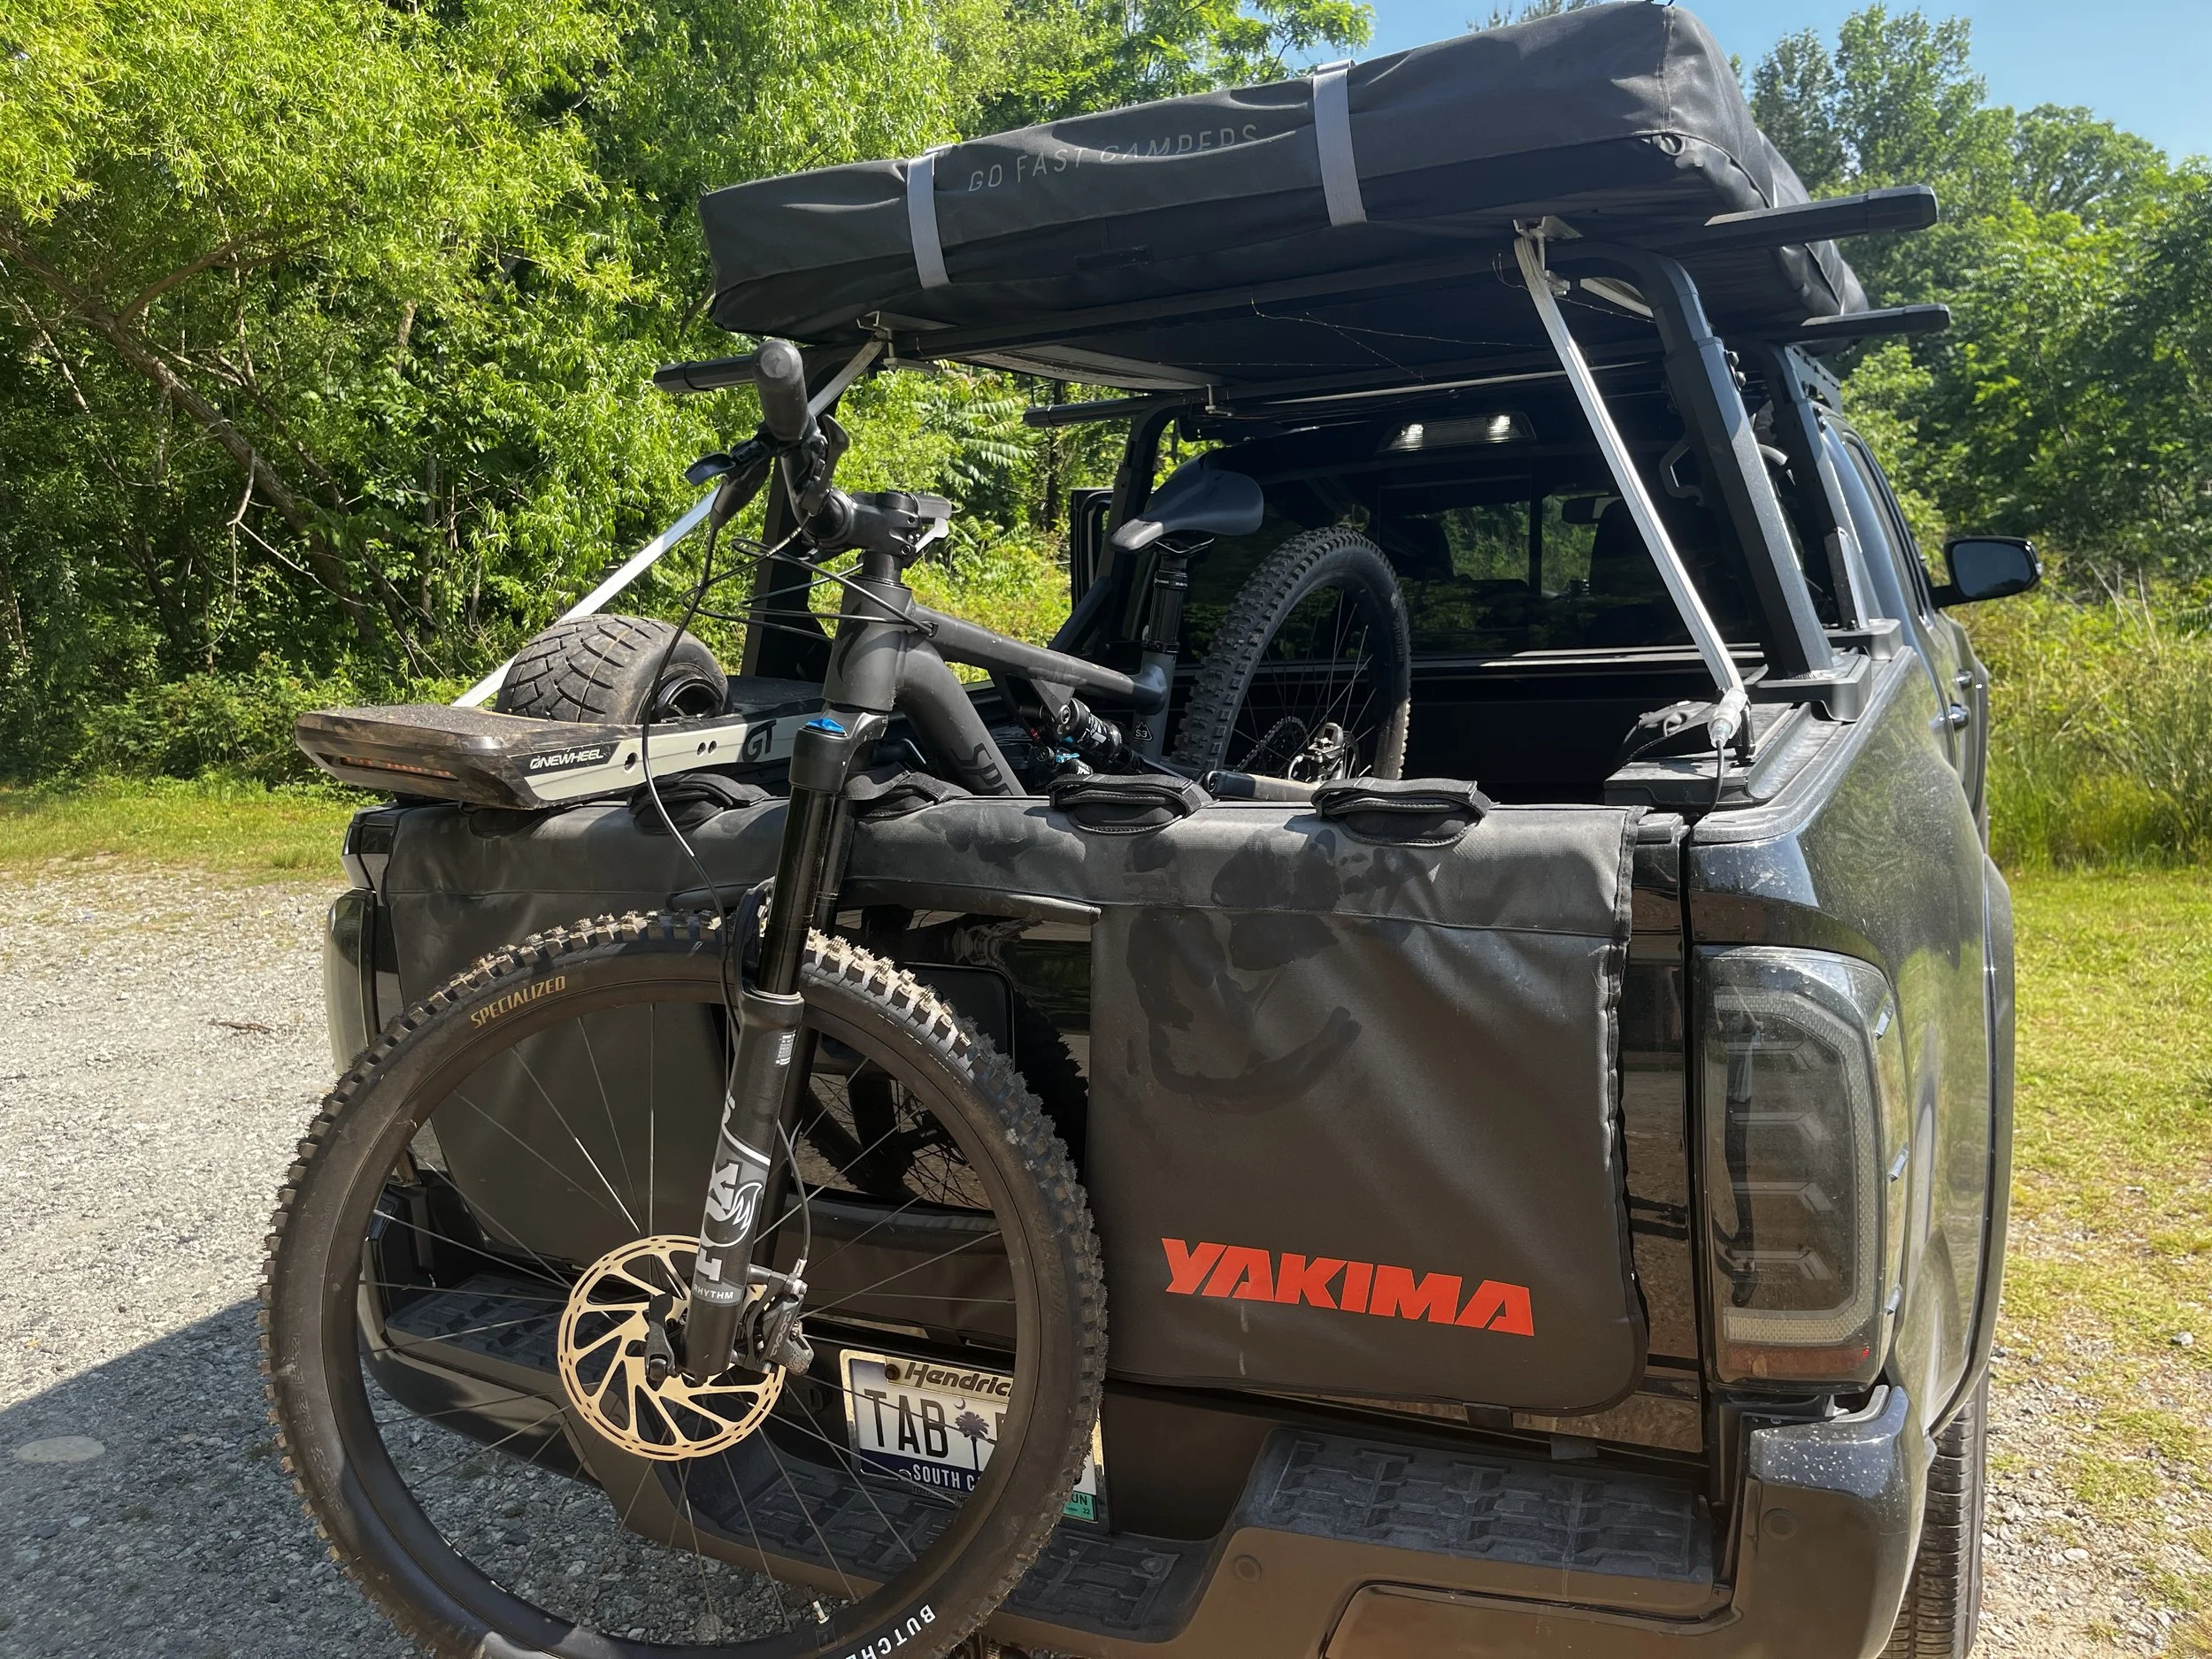
Yakima bike rack tailgate cover
Step 4: (Deprecated) Napier truck tent and annex
I started my Truck camping days in a Napier truck tent. This worked really well and I was impressed. We would basically park at a camp site, unload the gear from the bed and set up the tent in the back. We got the additional Annex that attaches to have extra room to stand up and change and provides sleeping space for the dog.
The tent was surprisingly compatible with the Retrax XR cover. It fit right over top and the cover actually gave us a nice little shelf inside of the tent. It was sweet!
We bought a large foam mattress to sleep on, and between that and the bedrug, we were pretty comfortable!

One important lesson learned: I first bought the Camo version of this tent because I thought it would be cooler. I absolutely hated it because it was just dark and eerie inside. I swear it fit differently too and was harder to install - I returned it for the gray version and was much happier with it.

The only problem with this approach is that once we parked to camp, we basically didn’t leave. It is not easy to pack up the tent to make a quick lunch run or drive to the trailhead. This left me wanting a bit more.
Step 5: Prinsu Roof Rack
The search for a new tent solution led me to start looking for a roof rack. Roof top tents seemed like the way to go, so it seemed like a roof rack was a good idea. Plus it would allow me to carry some surfboards on, even while my bed was full of camping gear. Oh, and they look cool.
I went with the Prinsu Roof Rack specifically because it allows you to customize the placement of the crossbars, so I could have the rack without it covering up my sunroof.

Step 6: Yakima Overhaul HD truck rack
As I was looking at roof top tents, I realized that having that tent completely over the top of the cab wasn’t very realistic, or desirable. A bed rack would allow me to carry whatever I wanted. The Overhaul HD is an amazing option. It integrates directly with the T-Slots on the Retrax cover and it is fairly straight forward to take the rack on and off. Also, the height is adjustable so it can be perfectly customizable to my needs.
Install of this rack was super easy due to the retrax integration. I was able to throw this sucker on by myself.
Note, I got the Large sized crossbars. They are a bit wider than they need to be to support my tesnt, but I am actually glad I bought that size, as the extra width can give me room to add an awning or other accessories.
Step 7: GoFastCampers SuperLite Rooftop Tent
After months of looking at rooftop tents, I came to the conclusion that this was the tent I wanted. It’s amazing because at well under 100 lbs, I can handle this sucker by myself and take it on and off the truck. It is easy to set up and take down and I can do either in about a minute or two. It’s all around just a great overlanding tent.
I ordered their Mattress along with the tent and I’m glad I did. It is super comfortable and fits perfectly. I’m able to leave the mattress inflated inside the tent, along with sheets and pillows so it’s literally ready to sleep in as soon as its up.
I had to wait for almost a year to get this tent, as I ordered it on pre-order. So during that year I worked to get the Prinsu and Yakima rack installed and ready to go.
Overall I’m pretty happy with this tent, but there is room for improvement.
I’ve had a few leaks in the tent, which is due to one of the seams going bad. GFC was quick to respond to my support request and sent me a sealant and instructions to seal the seam and it no longer has any leaking issues.
The bed is a bit on the small side. I’m pretty short, at about 5’8” and I can’t really sleep comfortably on my back. The low clearance at the front of the wedge makes it so that my feet don’t fit in that wedge space if they are straight up. So I have to lay on my side. This is easily fixed by just sleeping in the tent at an angle, but that option doesn’t work for two people. For two people, you basically have to both sleep on your side or stomach.
I do wish there were some easier ways to leave the doors open. Their current system allows you to roll the doors and screens and you have little loops at the top to pin them up, but I find those pretty hard to use. I’d love to have a quick way to velcro the doors open as another option.
Those are my only gripes with the tent though, and for a highly capable tent with so many amazing advantages that’s a pretty small list.

One thing I love about the tent is the way that i am able to position it. Unless a more typical rooftop tent mount, I have the tent offset so that I have a few feet at the rear of the truck bed that is not covered by the tent. This gives me space to carry taller items when needed, and I’ve definitely utilized this several times.
The position also allows me to take the tent up and down and get in and out without needing a ladder. I can reach the back zippers by opening the rear doors of the truck, and by standing on the truck rear tire. The back of the tent I can access easily just by stepping into the truck bed. If I’m climbing into the tent, I can step on the side rail of the retrax cover and use that as a step inside. Though— note, you want to avoid putting much weight on these rails to avoid shifting their angle, which could cause leaks in the cover.


Step 8: Dakar Add-A-Leaf
I had a small freak out moment when I learned about ‘hitch weight’ and I realized that my airstream basecamp had a 400 lb hitch, that took away from my very small 1000lb payload capacity of the Tacoma. Between the camper, passengers and gear that left us with almost no weight remaining. Because the GFC Super light adds another 80 lbs, I no longer saw this as feasible. I figured I would never be able to take both my truck tent and my camper and I’d probably just end up taking the tent off of my truck and never using it.
But then I found a solution- the Dakar Add-A-Leaf kit will add about 300lbs of payload capacity to a Tacoma. I worked with a local shop to get the kit ordered and installed. Initially I was worried about ‘ride quality’, that doing this may make it less comfortable to drive the truck generally but that hasn’t been the case. I don’t think I’ve noticed much of a difference to be honest.
Step 9: Ambient Solar Lighting
My truck camper wouldn’t be the same without some fun lights on the outside. I’ve gone through several iterations and am super happy with where I am now.
These solar lights are awesome! You can cut them to whatever length you want them and I have them running back and forth under the truck tent in the cab.
This solar panel is slightly different than most of the other ones on amazon. It absorbs more sunlight and just works better, but also the position of the wire inlet on the top gives me a solid anchor point for me to mount this directly to the yakima rack itself- which I’ve done with just two zip ties.
I then run the wire up the yakima rack and back and forth under the tent, specifically wrapped on the yakima rack so that I can still take the truck tent off as needed.
The lights come on automatically at night and they stay on pretty much all night long. It’s been almost a year now and they are still working perfectly. The put out a somewhat subtle, ‘twinkle’ that just makes me smile every time I see it.
The lights just finish out bed space and make it a cool place to sit and hang out. It’s just so peaceful and comfortable!
In some previous iterations I tried to get colored lights of a few different varieties, and they all worked okay, but they either required me to manually turn them on, or the light mode would reset when they came on at night and it would fire up some obnoxious lightning mode. One of these was an LED rope light that I got from Costco. The lights were pretty sweet and they fit really well. I plugged them into the bed outlet and they ran up through the gap between the Retrax and the tailgate, around the interior of the Bed Rack and came back down to end at a tie down ring at the other side of the tailgate. It was symmetrical and pretty well hidden. The problems I found were that after about 6 months the lights accumlated this layer of stickiness, maybe from the sun melting some of the plastic. The electric housing that I plugged into the outlet got wet and fried it so I took these down. I didn’t use them often because they were just a little over the top and needed the truck to be running.

Lessons Learned
There are a few key decisions I made along the way that I do think I would re-think if I were to start over:
1- Does everything really have to be removable?
I chose both the Yakima Overhaul HD cross bars and the Superlite tent because I could take those items on and off at will. But a year into adding these items, I have never taken them off. While I don’t think there are any better cross bar solutions than the Overhaul, I do think that I could have found a more roomy truck tent.
2- Why can’t my Retrax keep water out?
It’s been a constant pain point for me that this cover lets water in through the side rails. I think it is an installation issue and I’ve emailed them several times to try to figure out how to improve it. The current hypothesis is that there is a slight angle to the bed rails and that could be causing the leaks. Whatever the cause, it is just annoying. I hate that I built this whole system with a foundation that isn’t 100% rock solid.
3- Should I have just gotten a truck topper?
There are some really great camper shells out there. Whenever I see the Leer 122, high roof shell I am a bit envious. Not to mention some great camper shells with integrated roof top tents, like the GoFastCamper platform V2 and the AT Overland Summit.


Questions? Let me know what you’ve got and I’ll be happy to add more info!